You’re holding a baby with one arm while desperately reaching for wipes with the other, and suddenly you’re covered in something that definitely isn’t chocolate. Sound familiar?
Every new parent knows the chaos of diaper changes. You need those supplies right freaking now, not scattered across three rooms.
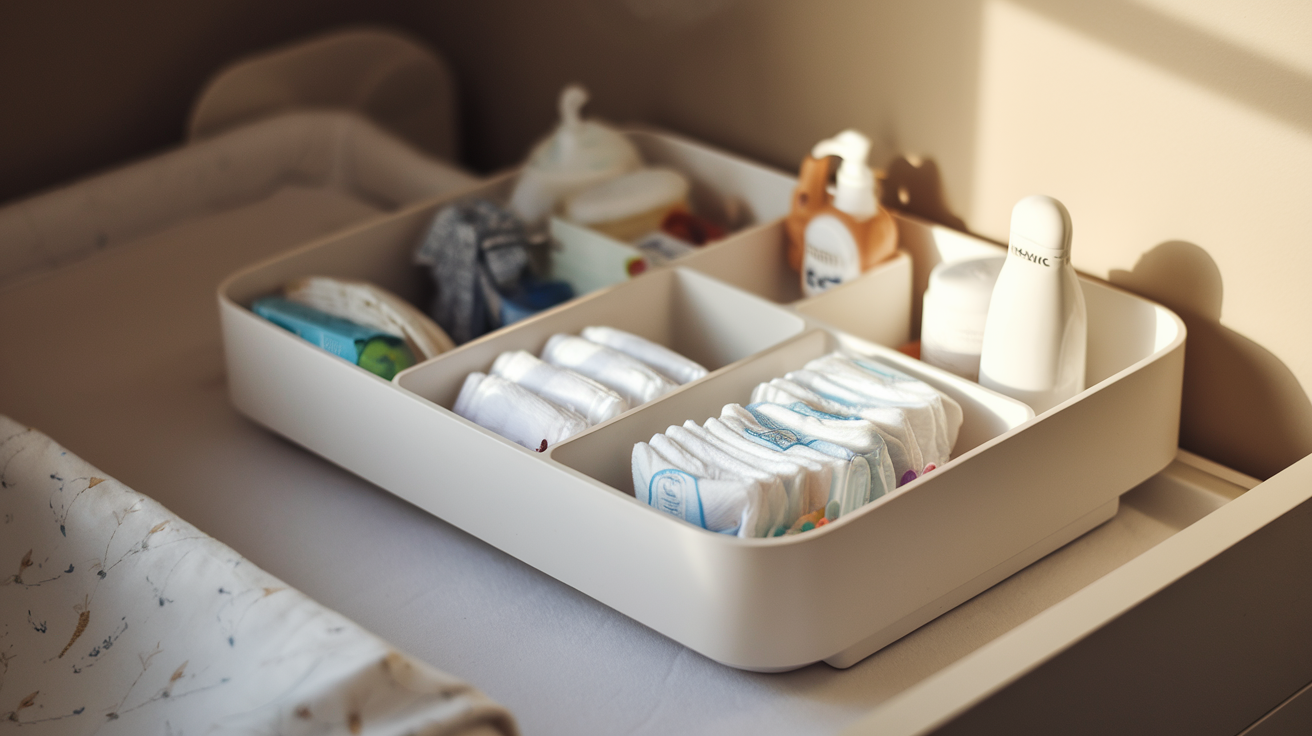
A well-organized baby diaper caddy isn’t just a cute nursery accessory—it’s your sanity-saving command center. But most parents are barely scratching the surface of what these organizers can do.
I’ve collected 10 diaper caddy hacks that transformed my parenting journey from “where are the wipes?!” panic to “I’ve got this” confidence. And the fourth one? That’s the game-changer nobody talks about.
Table of Contents
Choosing the Perfect Diaper Caddy for Your Needs

Space-saving designs for small nurseries
Finding yourself cramped in a tiny nursery with baby stuff everywhere? Been there. A space-efficient diaper caddy is your secret weapon. Look for slim, wall-mountable options that hang on the side of the changing table or crib. These vertical storage solutions free up precious surface space.
Multi-compartment organizers with tiered shelving maximize vertical space while keeping everything sorted. Some brilliant designs include:
- Corner caddies that utilize otherwise wasted space
- Under-shelf hanging organizers
- Caddies that attach directly to changing tables
The IKEA Råskog utility cart is perfect for tight spaces – it’s narrow enough to slide between furniture pieces but holds an impressive amount of supplies.
Portable vs. stationary diaper caddy options
Can’t decide between something that stays put or moves around? Consider your daily routine.
Portable caddies come with sturdy handles, making them perfect for parents who change diapers throughout the house. They’re lightweight and often have compartments designed specifically for wipes, creams, and diapers.
Stationary options offer more stability and typically hold more supplies. They’re ideal if you have a dedicated changing area and prefer everything to stay organized in one spot.
Some parents swear by having both:
| Type | Best For | Features |
|---|---|---|
| Portable | Multiple changing locations | Handles, lightweight, compact |
| Stationary | Dedicated nursery space | Larger capacity, more organization |
Material considerations for durability and cleaning
Let’s talk real life with babies: messes happen constantly. Your diaper caddy needs to withstand spills, leaks, and frequent cleanings.
Fabric caddies are lightweight and come in cute patterns, but check if they’re machine washable. Some features have removable liners that you can toss in the wash.
Plastic and metal options win the durability contest. They wipe clean in seconds and don’t absorb odors. Silicone inserts are another game-changer – they’re antimicrobial and dishwasher-safe.
For eco-conscious parents, bamboo organizers offer a sustainable choice that’s naturally antibacterial. Just avoid options with tiny crevices that trap dust and are impossible to clean.
Budget-friendly alternatives that don’t sacrifice quality
Dropping serious cash on a fancy diaper caddy? Unnecessary. Dollar stores and discount retailers offer plastic bins and baskets that work perfectly with a few modifications.
Repurpose items you already own:
- Kitchen utensil caddies
- Shower caddies
- Toolbox organizers
- Decorative baskets
DIY enthusiasts can transform cardboard boxes with fabric coverings or contact paper. Add dividers made from cardboard or foam board for customized organization.
Target’s Room Essentials and Walmart’s Mainstays lines offer affordable options under $15 that hold up surprisingly well. Amazon Basics also has a solid fabric caddy for under $20 that thousands of parents swear by.
The trick is focusing on functionality first. You need something that holds diapers, wipes, and creams in an accessible way – everything else is just bonus features.
Strategic Organization Systems That Save Time

Essential items to keep in your diaper caddy
Nailing the perfect diaper caddy setup is a game-changer. Stock these must-haves and you’ll thank yourself at 3 AM:
- Diapers: Keep 5-7 diapers easily accessible
- Wipes: A travel pack or small container
- Diaper cream: Small tube, not the giant one
- Hand sanitizer: Mini bottle for quick clean-up
- Changing pad: Foldable for tight spaces
- Extra outfit: At least one in case of blowouts
- Distractions: A Small toy or pacifier to keep the baby occupied
- Plastic bags: For dirty diapers when you’re away from trash
- Nursing cloth: Doubles as a burp cloth or a light cover
Many parents miss including a small flashlight – absolute gold for middle-of-the-night changes when you don’t want to turn on bright lights!
Color-coding techniques for midnight changes
Night vision gets fuzzy at 2 AM. Color-coding your diaper caddy is brilliant for those zombie-mode diaper changes:
Use red electrical tape or stickers for overnight diapers. Blue for regular ones. Green dots for sensitive wipes. Yellow for standard wipes. Your sleep-deprived brain will thank you.
Some parents swear by glow-in-the-dark tape on essential items. Just a quick charge under a lamp, and your diaper cream practically jumps into your hand in the dark.
Rotation systems for different diaper sizes
Babies grow at warp speed. One day you’re swimming in newborn diapers, the next you’re desperately hunting for size 1s. Try this rotation system:
- Dedicate a small section of your caddy to the “next size up.”
- When you notice your baby’s current diapers getting snug, you’ve already got backups ready
- Label each section clearly – “Current” and “Next Size”
Smart parents keep a reminder note in their caddy with weight ranges for each diaper size. No more squeezing baby into too-small diapers or wasting money on ones that are too big.
Creating designated sections for creams and wipes
The difference between diaper rash cream and regular lotion becomes critical at 3 AM. Create dedicated zones:
Prevention Zone: Daily barrier creams, powder
Treatment Zone: Stronger medicated creams for actual rashes
Clean-Up Zone: Wipes, cotton balls, cleansing cloths
Pro tip: Put a small piece of colored duct tape on the tops of similar-looking tubes. Red for rash cream, blue for regular lotion. Your half-asleep self won’t accidentally slather butt paste on baby’s face.
Quick-grab compartment for emergencies
When disaster strikes (and it will), you need an SOS section:
Create a small, accessible pouch containing:
- Extra wipes in a sealed baggie
- One diaper
- Travel-size cream
- Small hand sanitizer
- Disposable changing pad
- Two doggie waste bags (perfect for containing the evidence!)
The key is having this mini-kit ready to grab. When baby has a blowout in the living room while you have visitors, you’ll be a diaper-changing ninja instead of a frazzled mess hunting for supplies.
Mobility Solutions for On-the-Go Parenting

Converting your diaper caddy for travel purposes
Parenting on the move doesn’t have to be chaotic. Your diaper caddy can transform into a travel superhero with a few tweaks.
First, declutter ruthlessly. When traveling, stick to 5-7 diapers, one small pack of wipes, a travel-sized cream, and one change of clothes. That’s it.
Want a quick makeover? Add a sturdy handle or adjustable strap to your caddy. I used an old laptop bag strap on mine, and it was a game-changer for airport sprints.
Insert dividers made from cardboard or fabric to prevent the dreaded “everything spilled everywhere” nightmare. Think of them as little travel compartments that keep things from shifting when you’re rushing to catch that flight.
And here’s my favorite trick: designate a “quick-grab” section at the top of your caddy for the three items you reach for most. For me, that’s wipes, hand sanitizer, and pacifiers. When your baby’s having a meltdown in the middle of Target, you’ll thank me.
Car-friendly configurations of diaper caddy
Your vehicle just became command central. Make it work for you.
The best spot for your diaper caddy? Either between the front seats or secured on the back seat with a seat belt. Never put it on the floor where it’ll slide into oblivion during the first sharp turn.
Try these car setups that actual parents swear by:
| Configuration | Best For | What You’ll Need |
|---|---|---|
| Front-Seat Access | Solo parent drivers | Shallow, wide caddy + non-slip mat |
| Backseat Command Post | When someone’s riding shotgun | Caddy with hooks + backseat organizer |
| Double-Duty Door | Minimalists | Door pocket caddy + magnetic containers |
My personal favorite? The center console hack. Remove bulky items like diaper cream tubes and replace them with flat travel packets. This slims down your caddy enough to fit in most center consoles for lightning-fast access.
One-handed accessibility hacks
Let’s talk real life. You’ll often have a baby in one arm and need to grab something with your free hand.
Magnetic closures are your new best friend. Replace any zippers or snap buttons with magnetic strips—they open with a gentle pull and close themselves when you let go.
Roll diapers instead of stacking them. This isn’t just a space-saver; it makes them easier to grab one-handed. Picture grabbing a taquito vs. trying to separate one pancake from a stack.
Position your wipes container upside down in the caddy with the opening facing sideways. This weird-looking setup means you can pull wipes out with one hand without tipping the container.
The ultimate parent hack? Attach silicone bands around the edges of your caddy. They prevent items from falling out when the caddy inevitably tips over, giving you those precious extra seconds to react before disaster strikes.
Multipurpose Caddy Transformations

Repurposing your caddy for bath time essentials
The diaper caddy you’ve come to rely on doesn’t have to be a one-trick pony. Bath time can be a slippery challenge with a squirmy baby and all those bath products scattered around. Transform your caddy into the ultimate bath time command center!
Fill those handy compartments with baby wash, shampoo, lotion, and a couple of washcloths. Add in some rubber duckies and other water toys to keep your little one entertained. The best part? You can grab the entire setup with one hand while holding your baby with the other. No more mid-bath dashes for forgotten items!
Pro tip: Keep a small towel in the bottom compartment to catch drips. This hack saved my sanity during those early months when my daughter decided splashing was her life’s mission.
Feeding station conversion techniques
Mealtime madness is real, folks. Your trusty diaper caddy makes an amazing portable feeding station that follows you from kitchen to living room to wherever your hungry munchkin demands.
Stock it with:
- Bibs (at least 2-3)
- Burp cloths
- Formula dispenser or snack containers
- Bottles or sippy cups
- Pacifiers
- Small toys for distraction
The compartments keep everything organized, and the handle means you’re always ready for a feeding ambush. My son went through a phase where he’d only eat in different spots around the house – this saved me countless trips back to the kitchen.
Transitioning to a toddler craft organizer
Just when you think you’ve outgrown the diaper stage, your caddy gets a second life! Kids’ craft supplies multiply like rabbits, and a diaper caddy corrals the chaos perfectly.
Those dividers that once held diapers and wipes now store:
- Crayons and markers
- Small containers of Play-Doh
- Safety scissors
- Glue sticks
- Stickers
- Coloring books
The portability factor means art time can happen anywhere without turning your entire house into a creative disaster zone. When my twins were three, they went through an intense coloring phase – the caddy kept everything contained and ready for artistic inspiration.
Medication and first-aid station setup
Nothing’s worse than frantically searching for children’s Tylenol at 2 AM while your baby screams with teething pain. Transform your diaper caddy into a mobile first-aid and medication station that keeps essentials at your fingertips.
Create specific zones:
- Common medications (infant Tylenol, gas drops)
- Thermometer and fever essentials
- Band-aids and antiseptic
- Teething remedies
- Nasal aspirator and saline drops
Always keep medicines in their original packaging with dosage instructions visible. The caddy’s portability means your medical command center moves easily from nursery to living room to wherever you need it. When my little one caught his first cold, having everything organized in one place was an absolute lifesaver during those long, stuffy nights.
Customization Tricks for Personalized Efficiency

DIY dividers for better compartmentalization
Remember when your diaper caddy looked perfectly organized… for about 5 minutes? Then reality hit, and everything became a jumbled mess. Been there.
You don’t need fancy store-bought dividers to keep your diaper caddy organized. Grab some cardboard from that Amazon package you haven’t recycled yet (we all have them), cut it to size, and cover it with cute fabric or contact paper. Boom – custom dividers that fit your specific needs.
Even better? Use plastic folder dividers or cut-up plastic containers. They’re waterproof and can handle the inevitable diaper cream spills that would destroy cardboard.
My personal favorite? Repurpose silicone cupcake liners for small items like pacifiers and diaper cream. They’re washable, colorful, and perfectly sized for those tiny essentials that always seem to disappear.
Label systems that even sleep-deprived parents can follow
When you’re changing a diaper at 3 AM with one eye open, even the simplest organization system can feel like decoding hieroglyphics.
Color-coding saves lives (or at least prevents putting diaper cream where baby powder should go). Assign colors to different categories – blue for diaper stuff, yellow for creams, green for clothing items.
Picture labels work wonders, too. Snap photos of what goes where and stick them in the appropriate compartments. Your midnight zombie self will thank you.
For the tech-savvy parents, try vinyl labels made with a Cricut machine, or waterproof stickers that won’t peel off when things inevitably get messy.
Adding hooks and hanging accessories
Your diaper caddy real estate is precious, so why limit yourself to just the interior space?
Command hooks are your new best friends. Stick them on the sides of your caddy to hang essentials like pacifier clips, small toys, or even a mini hand sanitizer bottle.
Carabiner clips attached to the handle can hold extra pacifiers, teething rings, or a small toy to distract your wiggler during changes.
For fabric caddies, sew on some ribbon loops around the outer edge. These become perfect spots to clip pacifiers, small toys, or even a baby nail clipper set that always seems to vanish when you need it.
Small mesh pouches hung on the outside work wonders for storing items you need quick access to – like those magical nose wipes that save the day during sudden booger emergencies.
Tackling Specific Diapering Challenges

Solutions for storing cloth diaper accessories
Cloth diapering has its own special set of challenges. Those tiny inserts, wet bags, and diaper fasteners seem to multiply and vanish just when you need them! Here’s a game-changer: dedicate a spinning turntable in your caddy just for cloth diaper supplies. Label small containers for each type of insert, fastener, and liner.
Pro tip: Use mesh bags for pre-soiled liners that are waiting for the wash. They keep the smell contained but allow air flow to prevent mildew. Many parents swear by using silicone cupcake liners inside their caddy to separate different sizes of cloth inserts – they’re washable and come in fun colors!
Managing diaper rash products effectively
Diaper rash happens to every baby, but a disorganized system makes treatment harder. Create a “rash station” in your caddy with a clear container holding all your weapons against the red bumps.
Stack your creams and ointments upside down (like the pros do) so they’re always ready to squeeze. Small squeeze bottles for cornstarch or baking soda mixtures save space and prevent spills. And here’s something most parents don’t think about: label each product with the date you opened it. Diaper creams lose effectiveness over time, and having the date visible helps you know when to replace them.
Organization for multiple children of different ages
Diapering two (or more!) kids of different ages feels like juggling flaming swords. The solution? Color code everything. Give each child their own color section in the caddy.
For toddlers and babies, divide your caddy with adjustable drawer dividers. The baby section needs more cream and wipes, while the toddler area might include pull-ups and potty training supplies. Use magnetic labels that you can move as your children’s needs change. Many parents find success with stackable containers that can be grabbed individually during changes.
Night-time change optimization systems
Night changes are the ultimate parenting test. Half-asleep, in the dark, trying not to fully wake your baby (or yourself). Your caddy needs a night mode!
Install a small motion-activated light inside your caddy that turns on when you open it. Arrange supplies in the exact order you’ll need them – wipes, diaper, cream – so you can grab without looking. Keep a special “night diaper” section with your most absorbent options and overnight creams. Some clever parents use glow-in-the-dark tape to outline the shapes of essential items. And always keep a change of pajamas in a sealed bag at the bottom for those inevitable leaks that happen at 3 AM.
Tech Integration for Modern Parents

Incorporating baby monitoring devices
Your diaper caddy isn’t just for diapers anymore—modern parenting calls for modern solutions! Turn that caddy into command central by making room for your baby monitor. Seriously, this small tweak is a game-changer for those middle-of-the-night diaper emergencies.
Grab a small shelf insert or even a phone stand and secure it to the side of your caddy. This keeps your monitor at the perfect viewing angle, whether you’re changing a diaper or just need to keep an eye on your little one from another room.
Some parents swear by those mini portable monitors that clip right onto the caddy handle. That way, you’re never fumbling around in the dark trying to find where you left that monitor when baby starts fussing.
And don’t forget—most modern baby monitors need a safe spot away from potential diaper cream disasters. A small plastic container inside your caddy keeps that expensive equipment protected while still within reach.
Charging station additions for parenting apps
Who’s checking Wonder Weeks at 3 AM while changing a diaper? Plenty of us! Your caddy can easily double as a charging hub for the devices that keep your parenting game strong.
Install a small power bank in a dedicated pocket of your diaper caddy. This isn’t just convenient—it’s practically necessary when you’re tracking feedings, diapers, and sleep with your favorite parenting apps.
Try this hack: Run a short charging cable through a grommet hole in the bottom of your caddy, connecting to a nearby outlet. The cable stays hidden but accessible when you need to charge your phone.
Smart parents are adding small cable organizers to keep multiple charging cords tangle-free and ready to use. A simple binder clip attached to the edge of your caddy works perfectly for this purpose!
Smart lighting solutions for late-night changes
Nothing worse than blinding yourself and your baby with harsh overhead lights during those 2 AM diaper changes. Enter smart lighting solutions—they’re perfect additions to your diaper caddy setup.
Motion-activated strip lights attached to the underside of your caddy provide just enough illumination without disturbing the baby’s sleepy state. They turn on automatically when you reach for a diaper and shut off when you’re done.
Small touch-activated puck lights can be mounted inside your caddy’s compartments. A gentle tap gives you just enough light to see what you’re grabbing without hunting around in the dark.
Some parents are installing small, remote-controlled LED lights that can be dimmed to the perfect brightness. Keep the remote in an accessible pocket of your caddy for one-touch lighting control.
The best part? Most of these lighting solutions are battery-powered or rechargeable, so you’re not hunting for outlets in the middle of the night when you should be getting back to sleep!
Keeping Supplies Fresh and Accessible

Moisture-control techniques for wipes
Baby wipes drying out is a nightmare when you’re elbow-deep in a diaper change! The trick is creating a mini-environment that keeps those wipes perfectly moist. Flip over an old plastic food container lid, add a damp washcloth at the bottom of your caddy’s wipe section, and place your wipes stack on top. The moisture from the cloth will keep your wipes from drying out.
Another game-changer? Those silica gel packets you usually toss away. They work in reverse, too! Place a damp (not wet) one near your wipes to maintain humidity. Just remember to keep it out of the baby’s reach.
For travel, try this: place wipes in a ziplock bag, squeeze out extra air before sealing, and they’ll stay fresh twice as long.
Inventory management to prevent running out
Nothing’s worse than reaching for that last diaper at 3 AM. Set up a simple two-tier system in your caddy: active supply on top, backup stash underneath. When you notice the top level getting low (I use the “five diaper rule”), it’s time to restock.
Take a quick photo of your fully-stocked caddy with your phone. This visual reminder shows exactly what “fully stocked” looks like, so anyone helping with baby care knows what belongs.
Smart parents use the “one in, one out” rule – whenever you take the last item from your backup supply, immediately add it to your shopping list. The Cozi app or even a magnetic notepad on the fridge works wonders for this.
Space-maximizing folding methods
The military-style roll technique is a total space-saver for diapers. Roll each diaper tightly from bottom to top, then secure with the tabs. You’ll fit nearly 40% more diapers in the same space!
For onesies and burp cloths, try the file-folding method (think Marie Kondo). Stand items vertically instead of stacking them flat. This not only maximizes space but lets you see everything at a glance.
Baby pants and sleepers? Fold them in thirds lengthwise, then roll from waistband to feet. These compact rolls fit perfectly in caddy dividers that would otherwise go unused.
Blankets and changing pads can be accordion-folded – create tight, even folds back and forth until you have a slim rectangle that slides neatly into your caddy’s side pocket.
Rotation systems to prevent waste
Baby products expire, especially creams and ointments. Set up a “first in, first out” system like grocery stores use. New supplies go to the back, while older items stay in front for immediate use.
Color-coding is your friend. Use a dot of nail polish or a small sticker on items purchased in the same batch. When restocking, different colors go to different sections of your caddy.
Keep a mini-calendar in your diaper caddy and jot down when you open items like diaper cream. Most are good for 12 months after opening, but who can remember when that was without a system?
For items with actual expiration dates, try this trick: use a label maker or masking tape to create visible expiration flags that stick out slightly, making it impossible to miss soon-to-expire products.
Partner-Friendly Configurations

Creating intuitive systems for caregivers
Raising a baby isn’t a one-person job, and your diaper caddy setup should reflect that. The last thing you want is your partner staring blankly at your perfectly organized caddy, completely lost on where to find the diaper rash cream at 3 AM.
Start by organizing items based on frequency of use rather than your personal preferences. Diapers, wipes, and cream should be immediately visible and accessible. Color-coding works wonders here – try using blue bins for changing supplies and green for feeding-related items.
Labels aren’t just for Type A personalities anymore. They’re lifesavers when your partner is sleep-deprived and fumbling around. Keep it simple with picture labels if needed – a diaper icon for diapers, a cream tube for lotions.
Remember that weird organizational system that makes perfect sense only to you? Ditch it. Your partner shouldn’t need a treasure map to find the baby powder.
Handover protocols for parenting shifts
The midnight parent swap is a delicate dance. A well-organized diaper caddy makes it graceful instead of chaotic.
Try implementing a simple status report system with your caddy. A small whiteboard or sticky note area can track:
- Last diaper change time
- Supplies running low
- Special needs (extra cream applied, etc.)
This beats waking each other up with questions or discovering too late that you’re down to the last diaper.
Some parents swear by the “reset rule” – whoever finishes their shift resets the caddy to a standard configuration. This prevents the slow descent into chaos that happens when items get misplaced during multiple changes.
Communication tools for supply needs
Nothing causes more parenting stress than reaching for an empty wipes package at a critical moment. Your diaper caddy should double as a communication hub.
Consider adding:
- A small inventory checklist
- Reorder threshold markers (red lines on the side of containers)
- A dedicated “shopping list” section
Smart parents keep a pack of sticky notes and a pen in the caddy itself. When you use the last of something, immediately write it down.
Some tech-savvy parents use their phones to scan barcodes of nearly-empty items, automatically adding them to shared shopping lists. Old-school parents might prefer a magnetic whiteboard nearby for tracking supplies.
The key is making communication about supplies effortless when you’re both running on fumes and baby brain.
Maintaining Your Diaper Caddy System

Weekly reset routines that take under 5 minutes
Parents, you know the drill. That perfectly organized diaper caddy quickly becomes a jumbled mess of half-empty wipe packages and random diaper sizes. But here’s the thing—a 5-minute weekly reset can save you 20 minutes of frantic searching when your baby’s having a blowout.
Sunday evenings work great for most parents. Just:
- Empty everything out
- Wipe down the caddy
- Check inventory (especially wipes—they always disappear!)
- Refill and reorganize
Pro tip: Keep a mini checklist taped inside your caddy. When you’re operating on 3 hours of sleep, even the simplest tasks can slip your mind.
Cleaning schedules to prevent contamination
Baby stuff gets gross. That’s just reality. Your diaper caddy touches everything from changing tables to bathroom counters, making it a potential germ factory.
Quick cleaning guide:
- Daily: Wipe handles and frequently touched surfaces with a baby-safe disinfectant wipe
- Weekly: Remove fabric liners (if any) and toss them in with the baby laundry
- Monthly: Deep clean with warm soapy water and let it dry completely
Remember: Those cute fabric caddies? They need washing every 1-2 weeks. Plastic caddies need a good scrub too, especially in those little corners where diaper cream somehow always ends up.
Adapting your system as your baby grows
Your 3-month-old needs a completely different diaper setup than your crawling 10-month-old. As your baby gets older:
- Transition from tiny newborn diapers to larger sizes
- Add distraction toys for wiggly babies
- Include a small first aid kit once your baby starts moving
- Consider a secondary mini-caddy for upstairs/downstairs if you have a two-story home
When your little one starts rolling and grabbing, you’ll need lightning-fast access to everything. Reorganize so essentials are within one-handed reach.
Evaluating and upgrading your setup
Every few months, take a hard look at your diaper caddy system. Is it still working? Parents often stick with setups that stopped being effective months ago.
Signs you need an upgrade:
- You’re constantly running out of supplies
- Diaper changes take longer than necessary
- You’re always searching for items
- The caddy is overflowing or underutilized
Don’t be afraid to completely overhaul your system. Maybe you need multiple smaller caddies instead of one large one. Or perhaps a wall-mounted solution would free up valuable surface space. The perfect system evolves as your parenting journey does.
Mastering your diaper caddy setup is a game-changer for your parenting journey. From selecting the right caddy that fits your specific needs to implementing smart organization systems, these ten hacks can significantly reduce stress during diaper changes. Whether you’re customizing your caddy for maximum efficiency, integrating tech solutions, or ensuring it works for all caregivers, each strategy helps transform a simple storage solution into an essential parenting tool that evolves with your growing baby’s needs.
As you implement these diaper caddy hacks, remember that the perfect system is the one that works for you and your family. Start with the strategies that address your most immediate challenges, then gradually incorporate others as needed. Your diaper caddy should make parenting easier, not more complicated. With these thoughtful approaches, you’ll spend less time searching for supplies and more quality time bonding with your little one, which is what matters most during these precious early years.